
Want to learn how to use 3D lighting references?
Here’s what 3D lighting references are, how to use them to improve your work, and the essential things to consider to create original content.
Want to learn more? Read on!
What is a 3D lighting reference?
Let’s start with the basics, what 3D lighting reference is and what it’s not.
As the name implies, reference images are photos used as a reference to improve one’s work. In visual arts, reference images give the artist a better understanding of the subject to achieve a more profound sense of realism in their work.
Using reference images has been practiced by artists for ages; the images are used as a source of information and nothing more. All artists have used a reference at one point or another in their careers, both as a tool of study and to achieve believability. And references aren’t just limited to images. You can observe how light and shadows behave in real life and use your observations as a reference.
Using a 3D lighting reference is not cheating. These references won’t take any of your personal expression or somehow make the content less original. No matter how well-versed you are with proper lighting, you’ll still need reference images to achieve the highest level of accuracy.
That said, a reference image shouldn’t be copied or used directly in your work. You shouldn’t claim a reference image as your own.
How to use reference images
How do you use reference images? Here’s a walkthrough to using a reference image properly:
Collect 3D lighting references
You can choose one image as a reference or several images; it’s up to you. You want to consider the image’s resolution in .png or .jpeg formats. Avoid blurry images; the edges and lines must be clean and sharp. If the project calls for it, go for color-varied images too. Avoid low-sized images because these will become blurry when enlarged.
Check the details
You need to check the tiny details and description of the image. Checking the finer details lets you apply the proper lighting and shadows to your image. Using references isn’t simply copying the lighting but studying the differences between the picture and your own. You need to modify your work to achieve realism using the reference as a guide, but you shouldn’t be a slave to your lighting references.
We consistently publish lighting critiques, like this one. Use them to learn more about what it takes to use a lighting reference in the right way:
Combine your references
It’s best to use more than one reference image to achieve the highest level of realism. Depending on the project, you need drawing references, lighting references, color scheme references, etc., to get your creative juices flowing. We cannot rely purely on our own imagination, so we collect reference images carefully, habitually. Study different angles and genres to see how the lighting was applied to each one.
Import into a modeling software
Once you have several reference images, you can start importing these into a 3D animation or modeling software. The entire process is simple – just upload the files on your computer or scan them before uploading them within the software program.
Adjusting the asset
Once the image has been uploaded or created into the animation or modeling software, you can make vital adjustments using the reference images as a guide. You can give the character or object proportion, details, lighting, etc., to give life to the scene. You can also adjust the color and textures or even add finer details. The final step would be the clean-up process once the 2D image is converted to 3D.
Other ways to use reference images:
- Flip the reference images or mirror reverse
- Change the composition
- Combine several 3D lighting references
- Add new details to the image
In terms of getting as close to realistic lighting as possible, altering an image has its own unique set of challenges. Apart from honing your lighting skills, you’ll also need to learn and understand how light and shadows behave in real life, especially when cast on various surfaces – such as on a wet surface, on a metal surface, over a landscape at a specific time.
You’ll need to consider the natural curves and depth of the asset, facial features, angle of the sun or the light source, the colors of the shadows, and other design elements that’ll make the lighting believable.
The 3 Areas of a Form to Light
When applying the lighting to an asset – whether it’s a character’s face, form, or object – there are three main areas of the form to start. These are the light side, the shadow side, and the cast shadow.
As the name implies, the light side is the light area hit by a light source. The highlight is the brightest part of the surface as it is the area that’s exposed to direct light. On the other hand, the halftone is lighter than any value on the show. The color blends into the shadow or sometimes splits between the light and dark areas.
The shadow side covers the form shadow and its core and reflected light. The core is the darkest part of the shadow, while the form shadow consists of dark tones and gray tones that blend away from the core into the reflected light, which is the lightest of the three. The reflected light is the light reflected onto the subject. It’s usually generated by ambient light or on the surface where the object rests.
The shadow line is the transition between the light and shadowy side. The area that’s not facing direct light is the darkest area, which falls under the shadow line. No light’s hitting this area, and the darkness blends into the rest of the lighter shadows within the scene.
Character lighting
This type of lighting uses different lights to illuminate a character. In visual effects, character lighting adds depth and realism to a character while conveying the emotions and intentions of the character. Lighting also supports storytelling by eliciting the right emotions among viewers.
One of the essential lighting concepts in character lighting is 3-point lighting, which helps control the light and shadow. This concept involves placing three light sources to illuminate the character. These light sources are the key light, fill light, and backlight.
Using these light sources, you’ll need to determine the best areas to illuminate, draw the eye, and use lighting to portray the character and tell a story. The contours of the face, the play of color and shadows, the hardness or softness of the shadow lines, the angle of the face, and the light source are the factors that affect the final look of an image. The human eye focuses on the brightest spots or areas with more contrast.

Prisha – Created by Sara Tarr
Sun and Sky
In 3D animation, the sun is used as a directional light, but the light changes in color relative to the height. When the sun is closer to the horizon, light becomes warmer to simulate the sunset (low height angle values). On a cloudy day, soft shadows are applied, and lighting is diffused to simulate cloudiness.
Of course, you can’t create the sun without the sky, and in real life, the sky is akin to a diffused light source. To simulate the sky, you’ll use environment lights and align the sunlight from the sun in the environment light. You can create a sphere and assign a metal material to it to speed things up. This will create real-time reflections of the environment. Just aim at a point to align the light with the sun to simulate sunlight.
Outdoor Lighting
When it comes to outdoor lighting, the scene will play a significant role over the lighting because that’s where you’re basing the lighting from. What’s important is to match the sunlight and sky environmental light correctly to get the most realistic results.
To create compelling and convincing lighting, use objects in your scenes to interact with the light. This means creating many ray tracing interactions as the light reflects between objects set closer together. Shady areas will appear dark while the exposed areas are brighter.
The Haunted House – Designed by Blue Sky Studios’ Justin Gladis, Asset created by Sara Tarr
Indoor Lighting
There are a particular set of rules to stick to when it comes to indoor lighting, one of which is to illuminate in an enclosed environment. The interior will have walls, ceilings, and windows. Through raytracing, the light will bounce around within the enclosed environment, creating bright and occluded areas for very natural lighting. The light should react with the objects within the scene by reflecting off them and all over the surrounding walls to achieve realistic results.
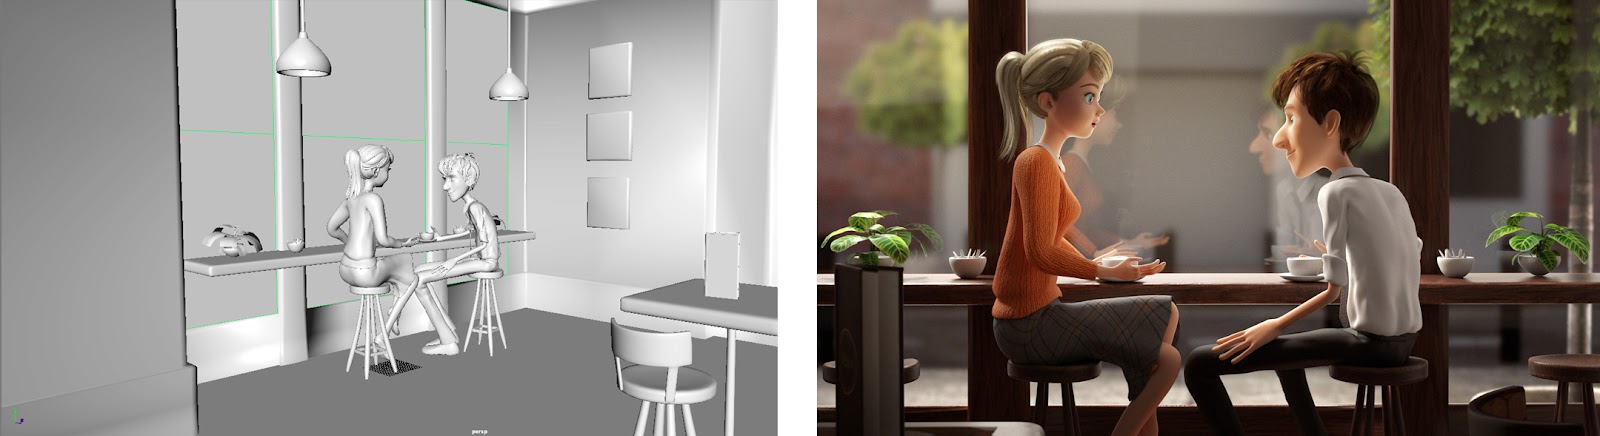
Morning Tea – Created by Sara Tarr
Object Lighting
Object lighting and shading add depth and dimension to any object. Use key lighting to make the object stand out. Key lighting is the strongest type of light, and it draws the eye to any bright areas. You can use fill lighting to remove dark shadowy areas, bring exposure and minimize contrast in a scene. To highlight the object’s silhouette, you can use backlighting, which creates a halo effect that makes the entire scene look magnetic.
The best 3D lighting reference tools and courses
Using reference images will take your work to a whole new level. Here are the best 3D lighting references tools and courses to check out:
3D lighting reference tools
Academy of Animated Art’s Lighting Assets Library
Our own Lighting Assets Library offers a library of assets that you can light right away. New assets are added to the library all the time and you get access to them for less than $6 per scene. Here are a few of our past students’ lighting works:
Learn more about our Lighting Assets Library here!
Handy Art Reference Tool
An app-based reference tool that can be used to practice and improve your final image. This lighting reference app consists of 3D model limbs – hands, feet, and skulls – that you can rotate, pose, and customize to improve your drawing. It also comes with fully adjustable 3-point lighting, so the app works as a lighting reference.
Portrait Studio
Portrait Studio offers a range of free-to-pose models, studio, and lighting to help artists grow and improve their craft. No need to buy physical models, the service provides a range of anatomical models that you can customize from any angle. With Portrait Studio, you can “draft, blueprint, and plan entire illustrations” from your computer without needing to learn modeling or buying expensive models. You can enhance the lighting of the scenes, adjust lighting intensity through its studio point light, and pretty much control models and scenes with just a few clicks of a button.
Skelly
Skelly offers a posable art model (a literal virtual human skeleton named Skelly) that you can control from any angle and lighting. This tool is designed to help artists visualize different poses from scratch. The skeleton model is interactive, allowing you to create a diverse range of movements and learn the nuances of a human body’s movement. The light source can be adjusted so you can study how different lighting positions affect the look of the model.
Sketchup
Designed for architectural visualization, Sketchup offers a suite of 3D modeling tools for artists of all levels. The program aims to empower artists by providing innovative visualization tools at your fingertips. You can use this tool to create bases that you can sketch on or paint over. Although Sketchup has no lights of its own, you can go to its Extension Warehouse to download an unlimited number of light sources. Once lighting has been added to Sketchup, you can apply the lighting to create realistic interior and exterior views. The service offers 4 subscription plans:
- SketchUp for Web
- SketchUp Pro
- SketchUp for iPad
- SketchUp for Schools
Blender
Blender is one of the most widely-used 3D animation software programs in the business. It’s an open-source program that supports the entire 3D pipeline, including using reference images to improve your own work. In fact, you can model anything from 3D lighting reference images in Blender. Blender is also helpful as a reference tool for lighting architectural models and human poses. Using the software program, you can upload reference images and visualize the lighting setup to achieve the most realistic results.
Daz Studio
This is a free program best used for character posing and scene mockups. Daz Studio has a section for models and backgrounds that you can use to visualize a scene, practice, and hone your lighting skills. The asset library has over 5 million assets and applications that artists can use for high-quality 3D renders and animations. The service is free, although registration is required.
Sketchfab
Sketchfab is a 3D modeling platform that lets you publish, share, discover, buy or sell 3D, VR, and AR content. The platform also offers a host of royalty-free 3D models to download for free. The free models, which you can access via the Sketchfab Store, can be used as lighting references. The assets vary from characters to creatures, weapons to vehicles, as well as robots and other fantasy characters and objects.
DesignDoll
DesignDoll is a software application that lets you manipulate human body models – called sketch dolls – in a 3D environment. With this program, you can create compositions and postures as well as freely set light sources to achieve realistic results. By using the “Import Tag,” you can import objects and adjust the settings in the preferences menu, including the lighting. Apart from the lighting, you can also customize the model colors and special effects.
Turbosquid
A digital media company that offers a library of 3D models that can be used for a variety of purposes, including lighting references. The models cover many industries, such as animation, computer games, interactive training, and architecture. The free 3D models are royalty-free unless otherwise noted. You’re also welcome to download multiple assets to be used as lighting references or in various projects.
Pixelsquid
Pixelsquid is a marketplace of ready-to-use stock images and 3D objects and characters that you can use as lighting references and for various 3D projects. The assets are created by TurboSquid artists. Some notable features include separating reflection, specular, and primary lighting layers and customizing the lighting without tuning the materials to achieve a more profound sense of realism.
Platforms for Reference Images
These are online platforms that let you showcase your 3D artworks and also find lighting references and inspirations:
- Artstation
- DeviantArt
- Behance
- Dribbble
- CGSociety
- Tumblr
- DrawCrowd
- Pixiv
- Ello.co
- Concept Art World
3D lighting reference courses
Lighting For Animation Course Bundle +
Here at the Academy of Animated Art, we’re all about providing the best education to aspiring artists for so much less. Our latest and greatest lighting course, the Lighting For Animation Course Bundle +, will help you achieve your dream job of becoming a lighter in less than a year – even with zero previous background in 3D lighting.
Course Curriculum
- The Power Of Light
- Character Lighting For Animated Films
- Environment Lighting For Animated Films
- Materials & Shaders For The Lighting Artist
- Compositing For The Lighting Artist
- Lighting An Animated Film
- Succeeding As A Lighter
At the heart of the Lighting For Animation Course Bundle + is our proven system, consisting of a comprehensive process to train you to become a competent lighting artist. It’s the same system that helped train hundreds of students who became successful lighting artists at Dreamworks Animation, Sony Pictures, Blue Sky Studios, Reel FX, Giant Animation, and many more!

Lighting By Academy of Animated Art Student Ryan Hansford
The bundle consists of 7 courses and free assets to practice on. The course comes with 2 hours of focused video lessons broken down into easy-to-digest clips. You’ll also get lifetime access to all materials, course updates, ready-to-light assets, and mentorship programs.
Apart from providing free assets to light, you’ll also learn from our mentors how to use reference images to improve your own work via our Discord channel.
Our artist community is growing every day, and it’s the best place to showcase your work and further your training. You’ll discover ways to adjust the lighting and learn how the experts do it to create impactful images that never fail to impress. Through our mentorship program, you’ll also learn more about the ins and outs of the industry while honing your lighting skills.

One of our happy students!
By the end of this course, you’ll be able to create a successful demo reel, connect with fellow artists and industry experts, apply for your first job as a lighting artist, get that job and thrive in a studio setting!
Lighting Real-Time Environments with Maria Yue
Lighting Real-Time Environments is an online course for intermediate-level artists. It is conducted by Maria Yue, a senior lighting artist at Splash Damage. In this course, you will learn the workflows for designing lighting in various scenes and characters. You’ll develop your artistic eye to make the most effective design decisions. The class consists of 6 pre-recorded lectures and a live Q and A.
By the end of this course, you’ll learn the importance of using reference images to improve your own, applying proper lighting in various settings, and choosing the right lighting approach to achieve realism in your work.
Lighting and Shading for Film Production
This online course focuses on lighting, shading, and rendering in Arnold for Maya. This course will teach you how to set up a simple lighting scene and explore various lighting typologies and designations.
This class is designed for intermediate-level artists, and it features high-level transmissive materials to reconstruct lighting and shading using effective rendering strategies. Apart from using Arnold for Maya, this course requires Nuke for shading and lighting.
Create & Design a Modern 3D House in Blender
Learn how to model a photorealistic, 3D architectural render using Blender in this online course. This online course will train you to work comfortably in Blender, which is notorious for the steep learning curve. You will learn how to use texture and make realistic materials in various settings during the lectures.
This online course is conducted by Stephen Pearson and is suitable for beginner to advanced level artists. By the end of this course, you will gain a deeper understanding of lighting in Blender, start a big Blender project, and render a beautiful 3D modern house.
3D Rendering By Lighting a Moody Nighttime Scene
Learn how to create a dramatic mood by applying various lighting techniques using Maya and Renderman in this online course. In this course, you will set up a natural scene and then add moody lighting as it transitions into a nighttime scene. You’ll add volumetric/atmospheric effects to enhance the mood and achieve the desired results.
This course is conducted by Evan Coates, a professional lighting artist. The course is designed for intermediate artists who want to hone their lighting skills.
Over to you!
Using 3D lighting reference images will help improve your work tremendously. But there are certain things to consider when using reference images. These images are strictly used as an inspiration and not a complete copy of the original.
Apart from using reference images, finding a supportive community that will help further your training is crucial. You get all that and more by signing up for our online course and joining our artist community.

